
Ever wonder why your curls drop before you’ve even found your keys? It’s a classic story. You spend ages getting them just right, only for them to go limp at the first sign of humidity. The secret isn't some complex wrapping technique—it's all in the prep work.
Creating those bouncy, salon-worthy curls that last all day (and maybe even into the next) begins long before you plug in your wand.
The Secret to Curls That Actually Last
Let's get one thing straight: if you want curls with staying power, you can't just jump straight in. The real magic happens with your pre-game strategy. Think of it as laying the perfect foundation before you start building. Get this part right, and your style is set up for success.
A few non-negotiable rules make all the difference. Skip these, and you might as well not even start.
Your Pre-Styling Checklist
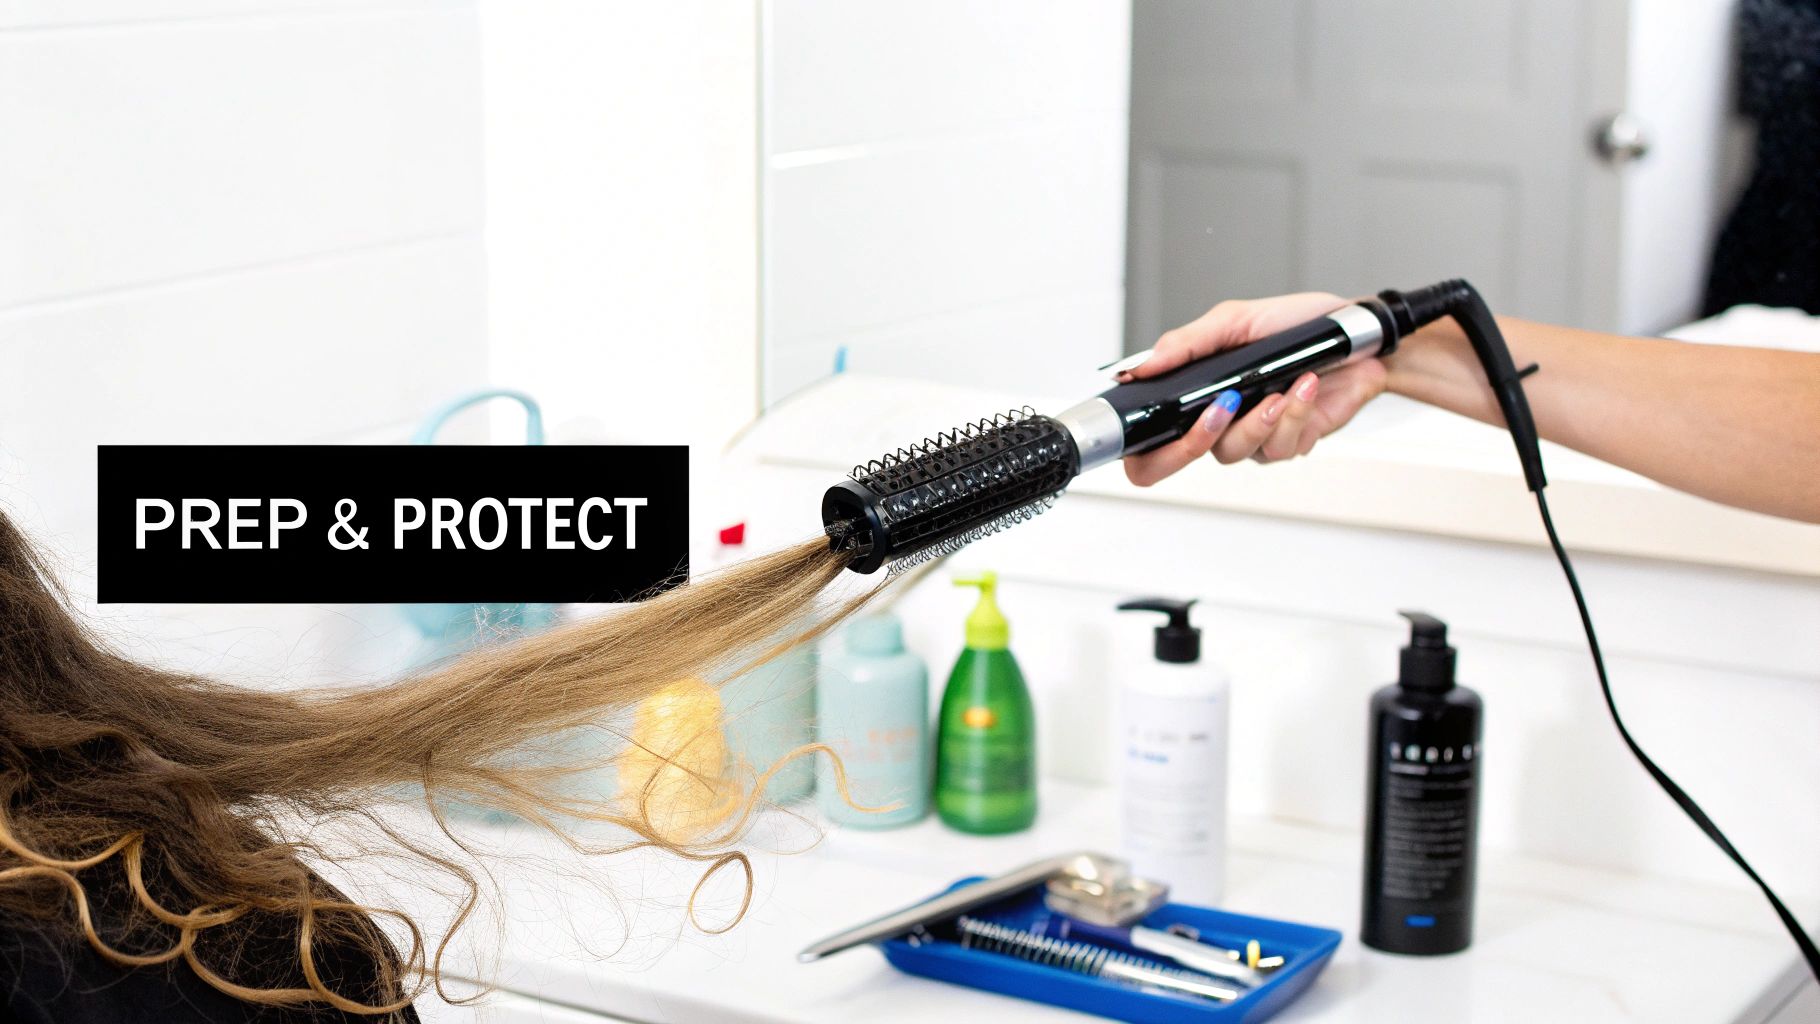
First up, your hair needs to be bone dry. I mean 100% dry, no cheating. Trying to curl even slightly damp hair is a one-way ticket to fried ends and a whole lot of sizzle. That dreaded sound isn’t just unpleasant; it’s the sound of your hair screaming for mercy as the steam literally boils it from the inside out. Yikes.
Once you’re sure it’s completely dry, it's time for the holy grail of heat styling: heat protectant. This isn't an optional step. A quality heat protectant spray or cream creates a shield between your precious strands and the intense heat, minimising damage and fighting off frizz before it even starts.
Not all protectants are created equal, though. You need to pick the right one for your hair type.
- Fine Hair? Go for a lightweight mist that won’t leave your hair looking greasy or weighed down.
- Thick or Coarse Hair? A cream-based formula will give you that extra dose of moisture and control you need.
- Colour-Treated Hair? Look for a product with UV filters to stop your beautiful colour from fading under the heat.
Using the right products isn’t just about damage control; it’s about creating a better canvas. Well-prepped hair holds its shape far more effectively, giving your curls more bounce and stamina to survive the day. You can find some of our expert advice on using products like Moroccan Oil for healthy, glossy hair when styling.
Why Wands Reign Supreme
There’s a reason curling wands have become so incredibly popular. We’ve all become obsessed with getting that pro-level finish at home, and our customers consistently tell us that wands are their go-to tool.
So, why the wand? It’s simple. Wands give you those smooth, modern, natural-looking curls without the awkward clamp marks that traditional tongs can leave behind. They’re the key to that effortless "I just woke up like this" wave everyone is after.
Choosing Your Perfect Curling Wand
Think of a curling wand as your magic wand for hair. Waving the wrong one won't turn your hair into a pumpkin, but it can lead to a tangled mess of frustration and curls that just don't, well, curl. Picking the perfect tool from our extensive collection isn't about grabbing the shiniest box; it’s about finding the right partner in crime for your hair type and the styles you’re dreaming of.
Let's cut through the jargon and decode the tech specs so you can shop like a pro. When it comes down to it, the two biggest things to consider are the barrel material and its size. These two elements dictate everything from how healthy your hair stays to the final look you'll be rocking.
Material Matters
The barrel is the part of the wand that gets up close and personal with your hair, so what it's made of is a pretty big deal. It controls how heat is spread and how smoothly it glides through your locks. Our collection features tools with the best materials for every hair type.
-
Ceramic Wands are brilliant for even heat distribution. What does that mean for you? No surprise "hot spots" that can scorch one section of your hair while leaving another totally limp. They're a fantastic all-rounder, especially if you have fine or colour-treated hair that’s a bit more delicate.
-
Tourmaline Wands are the superheroes of frizz-fighting. Seriously. Tourmaline is a gemstone that, when heated, kicks out negative ions. These little guys counteract the positive ions in dry or damaged hair, smoothing down the hair cuticle to lock in moisture and create an incredible shine. They’re a godsend for anyone battling the frizz halo.
-
Titanium Wands are the heavyweights. They heat up lightning-fast and hold a high, steady temperature like a champ. This makes them ideal for thick, coarse, or stubbornly straight hair that usually lets curls drop in five minutes. Just remember, with great power comes great responsibility—always, always use a heat protectant.
We've seen the evolution of curling tools in Australia, and clamp-free wands have truly revolutionised at-home styling. Stylists and home users alike fell hard for the natural, effortless waves they create so beautifully, which is why we've curated a collection of the very best wands for our customers.
Finding Your Barrel Size
The size and shape of the barrel are your creative controls. A different barrel can completely change the vibe of your hairstyle, taking you from tight ringlets to relaxed, beachy waves with just one simple tool swap.
It all boils down to one simple rule: the smaller the barrel, the tighter the curl. A larger barrel, on the other hand, will give you looser, more voluminous waves. It really is that easy to remember when you're browsing.
So, how do you pick the right one for your hair and the look you're after? Let's get into it.
Curling Wand Barrel Guide: Find Your Perfect Curl
Choosing a barrel size can feel a bit like ordering coffee for the first time—so many options! This little cheat sheet will help you find your perfect match from our collection, taking the guesswork out of getting the exact curl you want.
| Barrel Size | Best For Hair Length | Creates This Curl Style |
|---|---|---|
| 19mm (¾ inch) | Short to Medium | Creates defined, tight ringlets and bouncy spirals. Perfect for a fun, textured look. |
| 25mm (1 inch) | All Lengths | The universal favourite! Delivers classic, defined curls that can be brushed out into soft waves. |
| 32mm (1¼ inch) | Medium to Long | The go-to for those coveted beachy waves and loose, glamorous curls with lots of volume. |
| 38mm (1½ inch) | Long Hair | Ideal for creating very loose, 'undone' waves and adding subtle body and movement. |
| Conical (Tapered) | All Lengths | This cone-shaped barrel is wider at the base and narrower at the tip, creating a very natural-looking curl that is tighter at the ends. |
Ultimately, many people end up with a couple of different wands in their toolkit. A 25mm is a fantastic starting point for almost everyone, but having a larger or smaller one on hand gives you the freedom to play with different looks for different occasions.
Mastering the Perfect Curling Wand Wrap
Okay, you’ve picked your wand and your hair is prepped and ready to go. Now for the fun part: mastering the wrap. Honestly, this is where the real magic happens. Getting this technique down is the secret to moving from frustrating, lopsided curls to a gorgeous, I-just-left-the-salon look.
It all starts with sectioning. Please, don't just grab random handfuls of hair and hope for the best! That’s a one-way ticket to a messy, uneven style.
Divide and Conquer Your Hair
Think of your hair like a canvas. You wouldn't just throw paint at it randomly, right? You'd work section by section. The exact same principle applies here.
Start by splitting your hair into two main horizontal sections—a top and a bottom. Clip that top half right up and out of your way. If you’re blessed with super thick hair, you might even need to create three or four sections. This little bit of prep work is a game-changer because it guarantees every single strand gets its moment with the heat, giving you a much more consistent and polished finish.
Once you’ve got your bottom section down, you’ll work with smaller, vertical pieces from there. I find a width of about 2-5 centimetres is the sweet spot.
Pro Tip: The width of the hair you wrap completely changes the curl. A smaller, skinnier section will give you a tighter, more defined ringlet. A bigger, chunkier section will result in a much looser, more relaxed wave.
This infographic breaks down exactly how your hair length and the curl you're after should guide your tool choice.
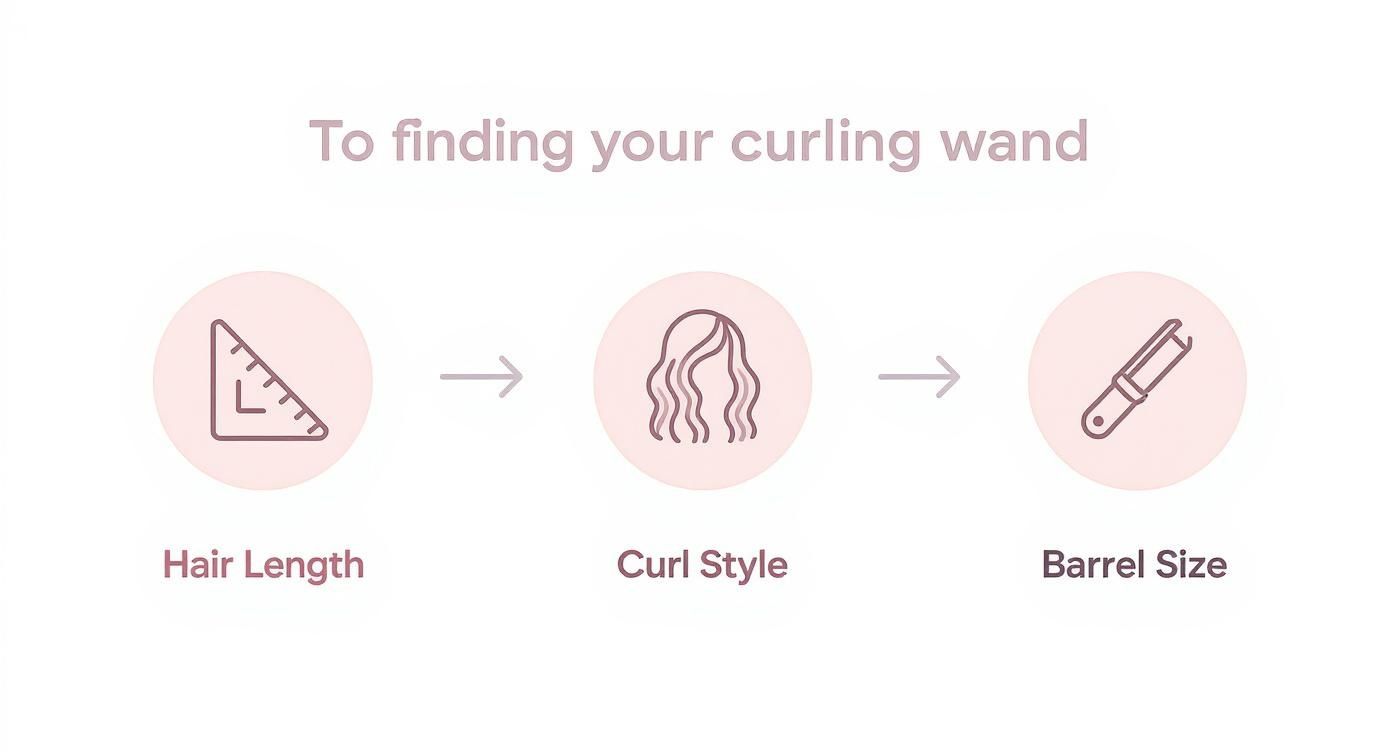
As you can see, getting these three things in sync is the key to creating the style you want without all the guesswork.
The Art of the Wrap
Now, let's get curling. Grab that first small section of hair. The way you hold the wand is absolutely crucial. For the most natural-looking curls, always hold the wand vertically, with the tip pointing down towards the floor.
Wrap the hair flat against the barrel, starting a few centimetres from your scalp and spiralling your way down. A common mistake is twisting the hair into a rope as you wrap it—don't do that! Keeping the strand flat ensures the heat gets to all of it evenly, giving you a much smoother, more defined curl.
For that modern, slightly undone finish, leave the last couple of centimetres of your ends unwrapped. Just hold them with your fingers (carefully!).
Hold the hair around the barrel for about 5-10 seconds. You'll need less time if your hair is fine or has been colour-treated, and a bit more if it's thick or coarse.
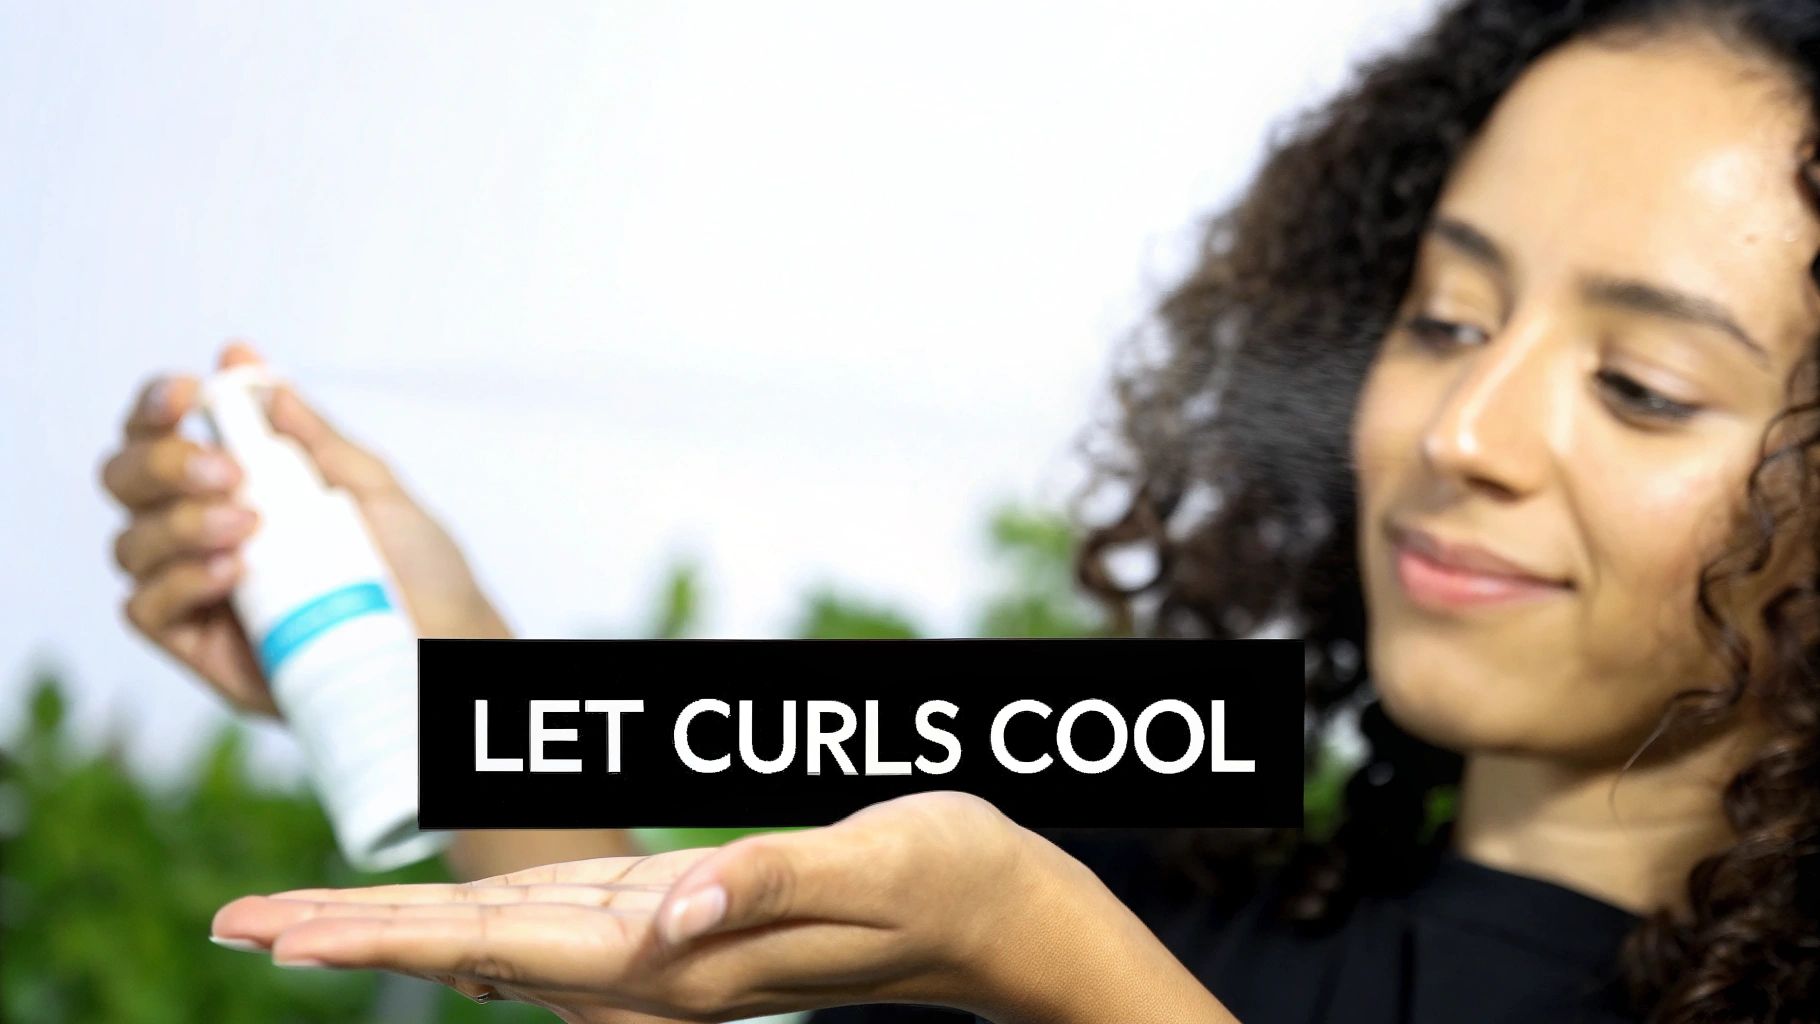
When it's ready, gently release the hair. Here’s a trick I swear by: instead of just letting the curl drop, catch it in the palm of your hand for a few seconds. Letting it cool in that coiled shape helps it set properly and last so much longer.
Direction Makes All the Difference
The direction you wrap your hair has a massive impact on the final vibe. There are no hard and fast rules, but here are the three main ways to do it and what they achieve:
- Wrapping Away From Your Face: This is the go-to technique for a reason. It opens up your features beautifully and creates that classic, windswept, glamorous look. It’s flattering on absolutely everyone.
- Wrapping Towards Your Face: This gives a completely different effect—more of a vintage, retro-inspired curl that softly frames the face. Think old-school Hollywood.
- Alternating Directions: Want that perfectly imperfect, beachy texture? This is your move. By alternating the direction of each curl, you prevent them from clumping together into one big wave, creating heaps of movement and dimension instead.
A big part of why the wands in our collection are so popular is just how easy they are to use. Practical features, like a long power cord, are every bit as important as the final curl when it comes to creating a seamless styling experience in your own home.
Mastering the wrap technique really is the core skill here. It might feel a bit clumsy at first—we’ve all been there!—but a little practice goes a very long way.
And hey, if you ever find yourself in a pinch without your wand, we’ve also got a fantastic guide on how to curl your hair with a straightener for a totally different kind of wave.
One Wand, Three Killer Looks: Unlocking Your Inner Curl Chameleon
Think that gorgeous new curling wand is a one-trick pony? Not a chance. That sleek tool in your hand is basically a magic wand for your hair, ready to conjure up any look you can dream of. You don't need a whole arsenal of different tools cluttering up your bathroom; with a few simple tweaks to your technique, you can go from polished and professional to carefree and beachy in minutes.
With just one wand from our incredible collection, you can master everything from a red-carpet-worthy Hollywood wave to that perfectly lived-in, "I woke up like this" texture. It all comes down to how you wrap, what direction you go in, and how you finish it off. Let's get creative.
The Hollywood Wave
For that timeless, old-school glamour, nothing beats the Hollywood wave. This look is pure elegance, creating a smooth, uniform, S-shaped wave that cascades down your hair. The secret weapon here? Consistency.
To absolutely nail this style, you have to curl every single section of hair in the exact same direction—always wrapping it away from your face. A key difference from other styles is that you wrap the hair flat against the barrel, like a ribbon, instead of twisting it. After you release each section, let it cool completely. Seriously, hands off! Once everything is set, you can gently brush through the curls with a wide-tooth comb or a soft bristle brush. This is what magically melds them all into one seamless, luxurious wave.
Effortless Beachy Texture
Dreaming of that "just back from the beach" vibe, minus the sand in your bag? The trick to perfect beachy waves is embracing a little bit of imperfection. This is where alternating the direction of your curls becomes your best mate.
Here’s how to get that relaxed, carefree look:
- Switch It Up: Curl one section away from your face, then curl the next section towards your face. This little trick is genius because it stops the curls from grouping up into one big curl, giving you incredible dimension and movement instead.
- Forget the Ends: For that modern, undone finish, stop wrapping the hair about 3-5 centimetres from the ends. Leaving the tips straight instantly gives the whole style a more relaxed, less "try-hard" feel.
- Give it a Tug: While the curl is still hot and fresh off the wand, gently pull on the end. This will stretch out the spiral, softening it into a looser, more casual wave.
When you're all done, just rake your fingers through your hair to shake it all out. A quick spritz of texturising spray from our styling range will add that perfect piecey separation.
Think of your wand as more than just a heater; it's a shaping tool. The way you wrap, hold, and release the hair is what dictates the final look. Play around! Experimenting is the best way to see just how much you can do with one tool.
Defined, Bouncy Ringlets
For a look that's full of life and energy, you can use your wand to create tight, bouncy ringlets. This works a treat with a smaller barrel wand, but you can totally pull it off with a larger one by simply taking much smaller sections of hair.
The secret is the ‘twist and wrap’ method. Grab a small section of hair and, before you even think about wrapping it, twist it from root to tip so it looks like a little rope. Then, wrap that twisted section around the wand. This forces the hair into a much tighter, more defined spiral. Be patient and let these little ringlets cool completely before you touch them. Then, gently separate them with your fingers—never a brush!—to keep that beautiful, springy definition.
Finishing Touches That Make All the Difference
You’ve done the hard yards—sectioning, wrapping, and holding—and now you’re surrounded by a halo of what look like perfect curls. But hold up! Don't even think about touching them yet. Seriously. What you do in the next five minutes is arguably the most important part of the entire process, especially if you want your hard work to last longer than your morning coffee.
The golden rule of using a curling wand is devastatingly simple: let your curls cool down completely. When your hair is still warm from the wand, its internal structure is still pliable. Touching it, brushing it, or even just looking at it the wrong way can cause those beautiful spirals to droop into sad, limp waves.
By letting each curl set in its coiled shape as it cools, you’re essentially locking in the style for maximum longevity. Think of it like firing pottery in a kiln; the cooling process is what solidifies the final shape and makes it permanent.
The Art of the Brush-Out
Okay, are your curls properly cool to the touch? Now the fun begins. The tool you use to separate them will totally change the final look, so pick your weapon based on the vibe you’re going for.
- For soft, glamorous waves: Grab a wide-tooth comb. It's your best mate for gently separating the curls without creating a frizzy mess, blending them into a seamless, flowing style.
- For a tousled, lived-in look: Your own fingers are the best tool in the shed! Just rake them through your hair to break up the curls for a more natural, piecey finish that doesn’t look too ‘done’.
- For a sleek, uniform finish: A soft bristle brush can work wonders, but be gentle! This method is perfect for creating that polished, old-Hollywood wave effect.
Here's my pro tip: The biggest mistake you can make is over-brushing. You’ve just worked so hard to create all that gorgeous texture, so don’t brush it all out! The goal is just to soften the curls, not completely eliminate them.
Lock It In with the Right Product
The final, crucial step is choosing a finishing product from our collection to give your style that extra hold, texture, and shine. This is what takes your curls from ‘good’ to ‘absolutely unforgettable’.
Our lightweight finishing spray is brilliant for locking everything in place without leaving you with that stiff, crunchy feeling nobody likes. It gives you a flexible hold that allows for natural movement while keeping frizz at bay.
If you’re aiming for that perfectly imperfect beachy texture, one of our texturising sprays is a must. A quick spritz adds just the right amount of grit and volume, giving you that enviable ‘undone’ look. To really nail that coastal-chic style, check out our complete guide on how to use sea salt spray for perfect beach waves.
These finishing touches are the real secret to getting a professional-looking result that lasts all day and well into the night.
Got Questions? We've Got Answers
Even when you've mastered the technique, a few nagging questions can pop up. It happens to the best of us! So, let's tackle some of the most common curling wand mysteries we hear about all the time.
"Why Won't My Curls Last?"
Ah, the age-old question! If your beautiful waves have a habit of disappearing before you've even had your morning coffee, there are usually a few sneaky culprits at play.
First up, let’s talk prep. Think of it like priming a wall before you paint. Skipping a styling mousse or a bit of texturising spray on damp hair is a missed opportunity for serious grip and hold.
Also, and I can't stress this enough, your hair has to be 100% bone dry. Even a hint of dampness will create steam when the heat hits, and poof! Your curl is gone. But the real game-changer? Let each curl cool completely in the palm of your hand for a few seconds before releasing it. That little pause is what locks the style in place. Don't skip it!
"Wand vs. Tong – What's the Actual Difference?"
It’s all about one little piece of metal: the clamp. A classic curling tong has that spring-loaded clamp to hold your hair's ends while you roll it up. A wand, on the other hand, is just the barrel. You do all the work, wrapping the hair around it yourself.
That clamp-free life is why wands are brilliant for those modern, beachy waves that look effortlessly cool, without any weird kinks at the ends. Tongs are your go-to when you're after those super polished, uniform, bouncy curls. We've got amazing options for both, so it just depends on the vibe you're going for.
The tool you choose really dictates the end result. Wands are for that relaxed, 'I woke up like this' texture. Tongs are the master of the perfect, classic ringlet. Neither is better – it’s all about the look you want to create.
"How Do I Stop Sizzling My Fingertips?"
Ouch! We've all been there. The best way to keep your fingers safe is sitting right there in the box: that heat-resistant glove. I know, it can feel a bit awkward at first, but trust me, it's your best friend. Use it!
Here’s another little trick I swear by: as you wrap the hair, make sure you're holding onto the very last centimetre of the strand. This naturally keeps your fingertips a safe distance from that scorching hot barrel. And, of course, always work in front of a well-lit mirror, turn off distractions, and just take your time. You’ll get the hang of it and soon be curling safely without a second thought.
Ready to arm yourself with the right gear for your hair goals? Check out the entire collection of professional-grade wands, tongs, and styling must-haves at On Line Hair Depot.


